Setting up an Ubiquiti EdgeRouter to use CloudFlare for Dynamic DNS
It's easier than you might think to use CloudFlare as your dynamic DNS provider. Let's set it up!
I am a huge fan of Ubiquiti’s products. I own a number of the EdgeRouter X, as well as a variety of the devices in the Unifi product line. I am also a huge fan of CloudFlare, and use them to host DNS for all of my domains. In addition to great performance and security features, CloudFlare makes a great dynamic DNS provider due to their combination of short default TTL, and a robust API. This pairs well with EdgeOS, which ships with a full-featured dynamic DNS client capable of interacting with the CloudFlare API.
Just one catch: Ubiquiti doesn’t show CloudFlare as a supported dynamic DNS provider within the router’s web UI, so we have to do a bit of manual configuration. Here’s how you get it done.
Requirements
Before getting started, you’ll need the following:
- The latest firmware for your EdgeRouter device
- A CloudFlare account
- Your own domain, configured to use CloudFlare for DNS
Once all of those things are set up, we’re ready to get started.
Set up your (sub)domain A record
You’ll need an A record configured in CloudFlare for the subdomain you want pointing to your router. If you don’t already have an A record, follow CloudFlare’s instructions for setting up an A record. Temporarily set the IP address for this record to 216.58.219.196, which is one of the IP addresses for google.com. Once we configure the router, this address will be updated automatically.
NOTE: You can use your domain’s top-level record if you’d like, instead of a subdomain. It’s entirely up to you, and the process is the same. I personally prefer to use a subdomain so that my domain’s top-level record can be pointed elsewhere.
Get your CloudFlare API key
CloudFlare uses an API key to authenticate requests to the API. You’ll need this key in order to configure the router’s dynamic DNS client. Follow CloudFlare’s instructions for getting your personal API key.
Configure your router’s dynamic DNS client
Now that your DNS record is added, it’s time to set up the dynamic DNS client in your router. There are two ways of going about this: the console (command line), and the config tree in the web UI. It’s your choice how you’d like to do it, both methods get the same result. If you’re not familiar with using the console and/or don’t know how to use SSH, it’s probably best to stick with the web UI config tree.
For the purposes of demonstration, we will be using the following details in this tutorial:
- Domain:
example.com - Dynamic DNS subdomain:
dyn.example.com - CloudFlare username:
[email protected] - CloudFlare API key:
93c86aa10fbd56bfea6820d28f25b3b955573557 - Network port/interface:
eth0
Please replace any of these values with your own wherever they appear in this tutorial.
Console
If you’ve opted to go the console route, use this section. If not, skip to the web UI section.
SSH to your router’s private IP address, and enter the login credentials you use to log into the web UI.
Once connected, put the router in configuration mode:
configure
Set up a custom dynamic DNS service entry for CloudFlare, and configure the service to use your CloudFlare account credentials.
Please review each command for anything you may need to change to match your specific configuration before running the command
set service dns dynamic interface eth0 service custom-cloudflare protocol cloudflare

set service dns dynamic interface eth0 service custom-cloudflare server www.cloudflare.com

set service dns dynamic interface eth0 service custom-cloudflare host-name dyn.example.com

set service dns dynamic interface eth0 service custom-cloudflare login "[email protected]"

set service dns dynamic interface eth0 service custom-cloudflare password "93c86aa10fbd56bfea6820d28f25b3b955573557"

set service dns dynamic interface eth0 service custom-cloudflare options "zone=example.com use=web ssl=yes"
Commit your changes, save them to the persistent router configuration, and exit configuration mode:
commit
save
exit
Check the status of your client configuration:
show dns dynamic status
You should see something similar to this:
interface    : eth0
ip address   : YOUR_IP_ADDRESS
host-name    : dyn.example.com
last update  : Tue Jan 31 01:03:46 2017
update-status: good
If you check the A record in your CloudFlare account, you should see that the IP address has been updated.
Web UI
If you completed the steps in the console section, skip this section. Otherwise, proceed with this section.
The config tree in the web UI provides a graphical interface to applying custom settings to EdgeOS, including dynamic DNS.
Click the “Config Tree” tab across the top of the page.
Drill down inside the tree structure on the left side: service > dns > dynamic > interface
Add a new interface entry, using the name of the interface for your WAN connection. Example: eth0. Click “Update List”.
Drill down into the newly added interface entry on the left, and then the service sub entry.
Click the “Add” button to create a new service entry, and call it custom-cloudflare, and click “Update List”.
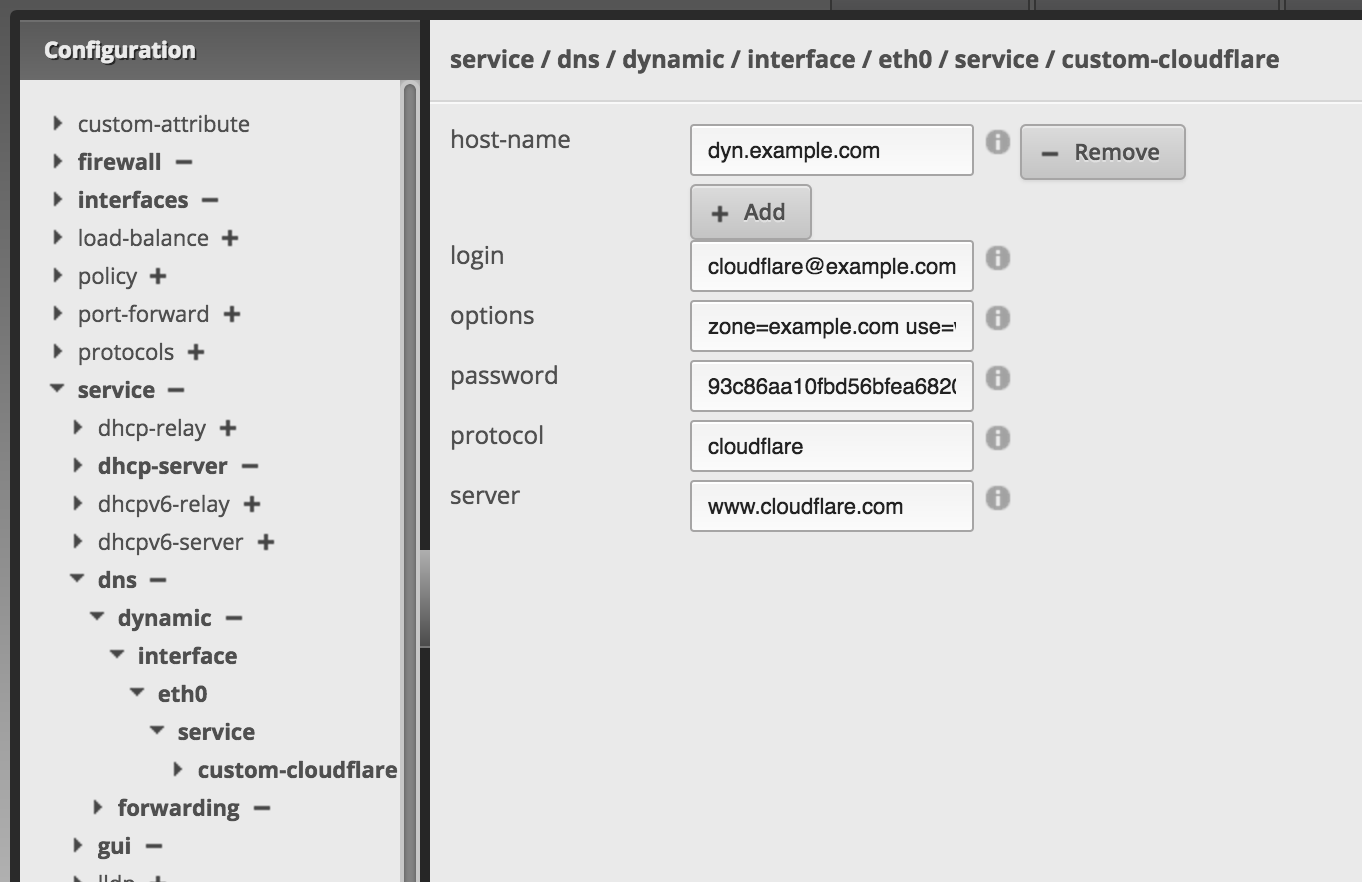
Drill down into the newly added custom-cloudflare entry on the left.
Click “Add” next to host-name and provide your dynamic DNS subdomain. Example: dyn.example.com.
Fill out the rest of the form fields as follows:
- login: Your CloudFlare username. Example:
[email protected] - options: Update the following line with your domain, and paste it into the field:
zone=example.com use=web ssl=yes - password: Your CloudFlare API key
- protocol:
cloudflare - server:
www.cloudflare.com
Click “Preview” at the bottom of the screen, and click “Apply” when prompted.
Navigate back to the custom-cloudflare service on the left. Your screen should look similar to this:
When you check the A record in your CloudFlare account, it may not be updated with your IP address. If that’s the case, you will need to force your router to do an update. Go to the Services tab at the top of the screen, then choose the DNS sub tab, and click “Force Update” at the bottom of the screen.
You’re done!
That’s all there is to it! Your router will now monitor your public IP address, and update the A record in CloudFlare if that IP address ever changes. You can play around with any of CloudFlare’s other features in relation to services you host behind your router, and use things like CNAME records to point multiple hostnames at your router using a single dynamically updated record. Have fun!