How To Self-Host an Infinitely Scalable WordPress Site on a Shoestring Budget
Scale your site with the big boys, on the budget of a boutique.
I love WordPress. I use it for nearly all the sites I build, I write plugins for it, I run this site on it. It’s an awesome content management system and blogging platform. I love that I can modify and extend it with plugins and themes however I want, without restriction. I love that it’s open source, so I can contribute to it being a better product and use it pretty much however I want without fees and license restrictions. I love that it’s easy to use, so I can build client sites on it and the client can manage their own content with ease. Most of all, I love that I can host it myself and set it up exactly how I want it.
Anyone who’s hosted their own site will tell you that, while it’s awesome to have complete control over your software and content, it’s not always the easiest thing to do. This complication comes into sharp relief when you get exactly what you want: lots of visitors! Scalability is tough, and can be prohibitively expensive if you’re managing it yourself. If you’re like me, and it’s likely that you are since you’re reading this post, that problem is begging you to solve it yourself rather than fall back on hosting your site on a managed service. Luckily, I have the solution.
Hooray Cloud!
The trick to a scalable, self-hosted WordPress site is cloud services. Specifically, CloudFlare and AWS CloudFront. CloudFlare provides DNS and web application security services, starting at the very affordable price of free. I won’t go into great detail about how their service works, all you need to know is their DNS routing architecture is just what the doctor ordered to make this whole setup work for your users without issue. You’ll see why later on.
CloudFront is a content delivery network operated by Amazon Web Services. Unlike most other CDNs that require an expensive contract for tons and tons of bandwidth bought up front, CloudFront charges you only for what you use.
Advantages & Disadvantages
Before diving into the setup process, let’s go over the costs and benefits of using this setup.
Advantages: Your site will have nearly limitless scalability, so if you’re lucky enough to end up on the front page of Reddit your site won’t crash - or even break a sweat. You also won’t have to have an exorbitant hosting bill keeping all those extra resources on standby when you don’t need them. Your site will be more reliable, and more secure when you throw in the CloudFlare bit.
You also won’t need to set up CDN rewriting if you want to serve static assets like CSS, JavaScript and image files from a CDN, because your entire site will be served from a CDN! This also reduces the number of DNS queries a user’s browser has to do, because everything is coming from your site’s domain, so load time is reduced.
Disadvantages: Your cost could skyrocket if you suddenly get a ton of traffic. Since CloudFront charges for what you use, you could end up spending a lot of money in that “front page of Reddit” scenario mentioned a moment ago. Luckily, Amazon provides a calculator so you can get a sense of what it will actually cost to route your site through CloudFront. It’s up to you what you’re willing to spend, though Amazon provides some ways to keep the costs lower within CloudFront’s settings. As we go through the howto I’ll discuss some other cost-saving methods as well. Regardless, I am in no way responsible for whatever costs you incur from using my setup.
This architecture is intended for sites that are primarily accessed as read-only, and won’t be nearly as effective for sites with lots of interactivity. If you’re maintaining a blog this will work great (even if you get lots of comments), but if you’re running an e-commerce site you’ll need to add some more server power beyond what I describe here to achieve true scalability. That’s not to say this setup is won’t help you; it will. It just means that it might not solve all your problems.
Setting It Up
If you’ve gotten this far, I assume you want to use my method. Excellent!
The first thing you will need is a hosting environment for your WordPress site. Any host will work, whether it’s a shared hosting plan or a dedicated server. Your host doesn’t have to have a lot of horsepower, because we won’t be giving it much of a workout. For this tutorial I’ll be using a 512MB memory server on DigitalOcean, which runs me $5 a month. My wallet is off to a good start.
Once you have your host picked out and purchased, you’ll need to pick a subdomain to use with your WordPress install as the origin for CloudFront. If you’re unfamiliar, a CDN needs a location from which it can get the requested assets. This is called the origin. Since your site’s actual address is going to be pointing to the CDN, we can’t use that address for your WordPress install location, so we’ll need to set up an alternate address. What I like to do is use the format origin-xxxxx.example.com, where xxxxx is a randomly generated string. This makes it more difficult for anyone to figure out and access your site’s origin directly. I generate the string at Steve Gibson’s Perfect Passwords page and use a portion of the “63 random alpha-numeric characters (a-z, A-Z, 0-9)” string. My end result is some thing like origin-OaJBRCco6ofY1zvf244ea.christiaanconover.com.
Now it’s time to install WordPress. I’m not going to spend time walking you through that since there are countless other tutorials for that tailored to pretty much every hosting environment on the planet. For those using DigitalOcean (or another VPS provider), DigitalOcean has tutorials for installing WordPress on Ubuntu using Apache or Nginx. When you’re doing the setup, the important thing to remember is to use the subdomain we just created instead of your site’s actual address.
W3 Total Cache
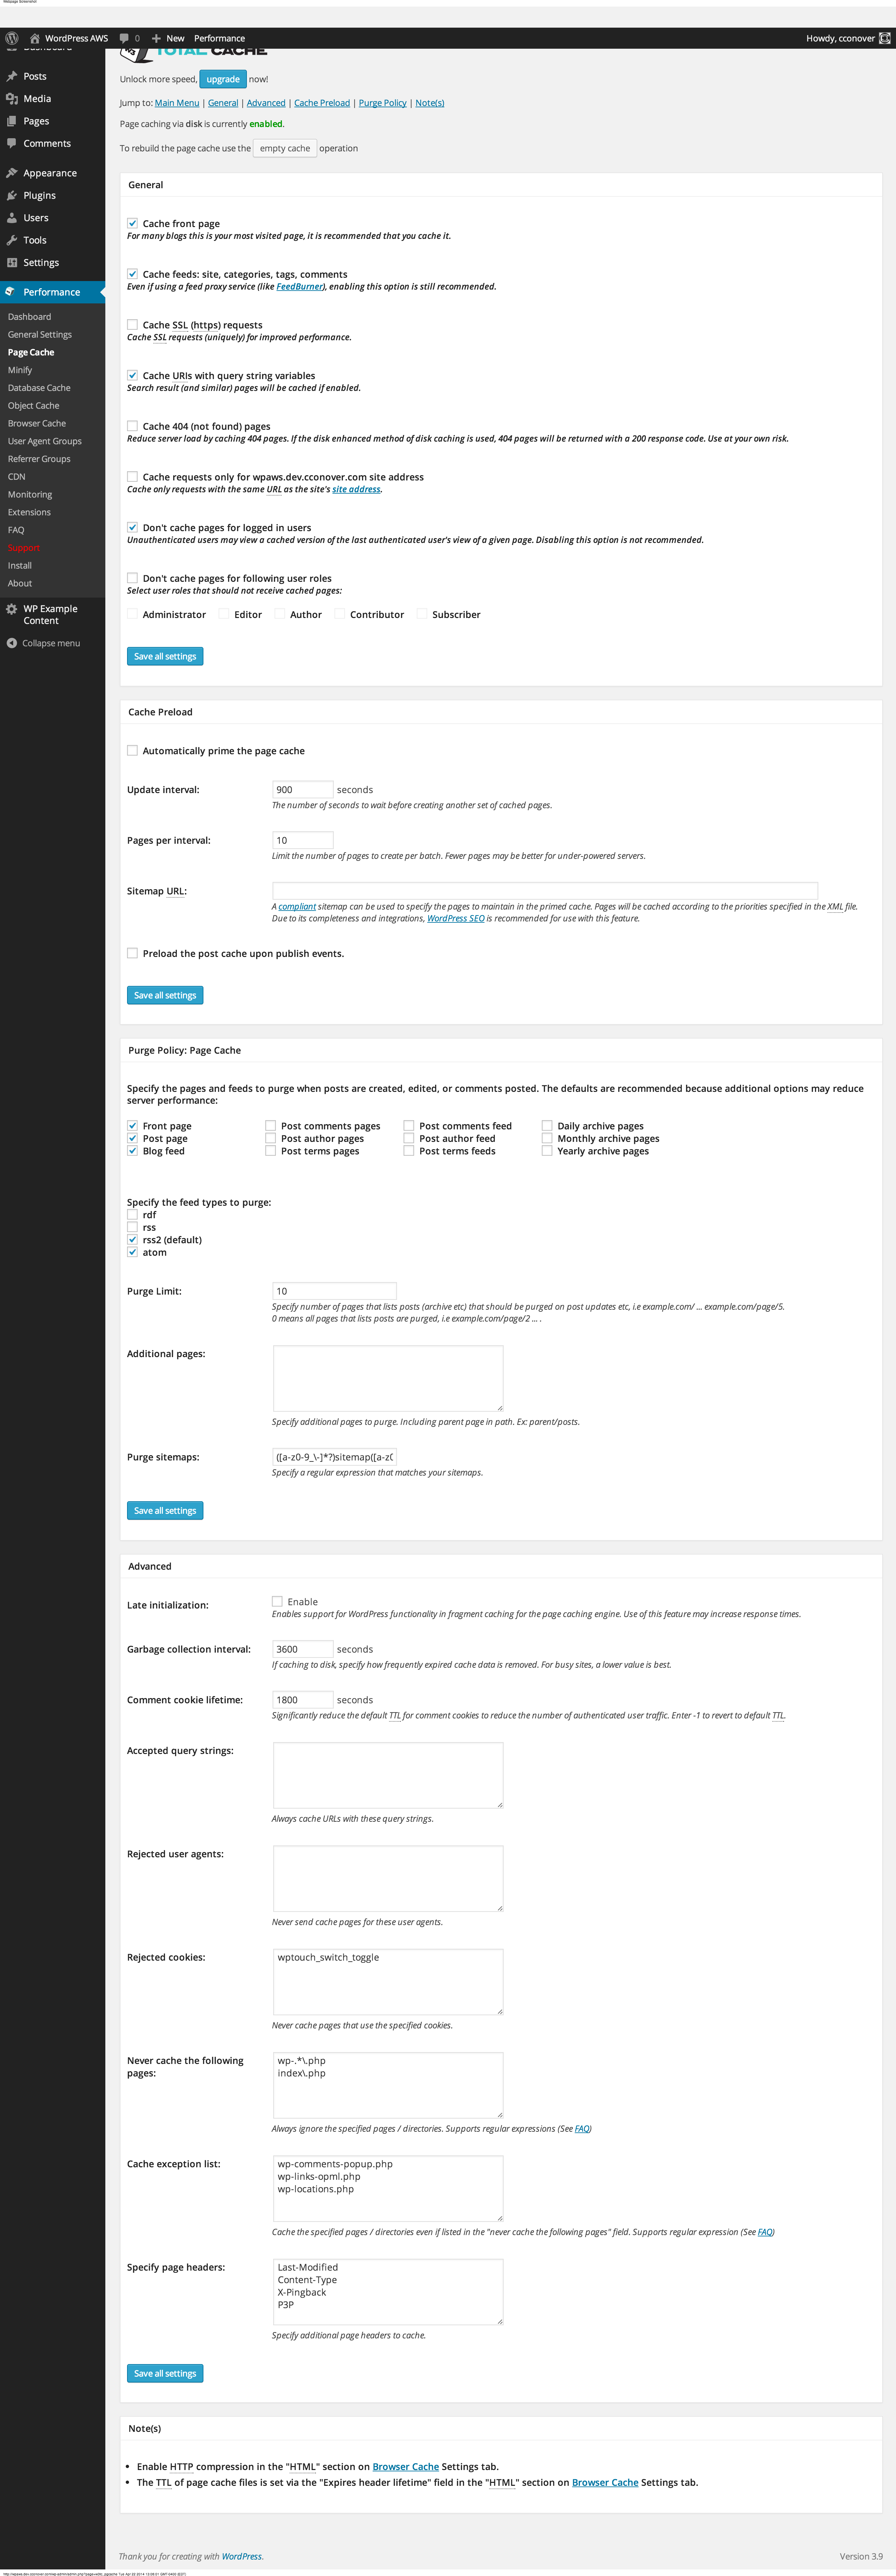
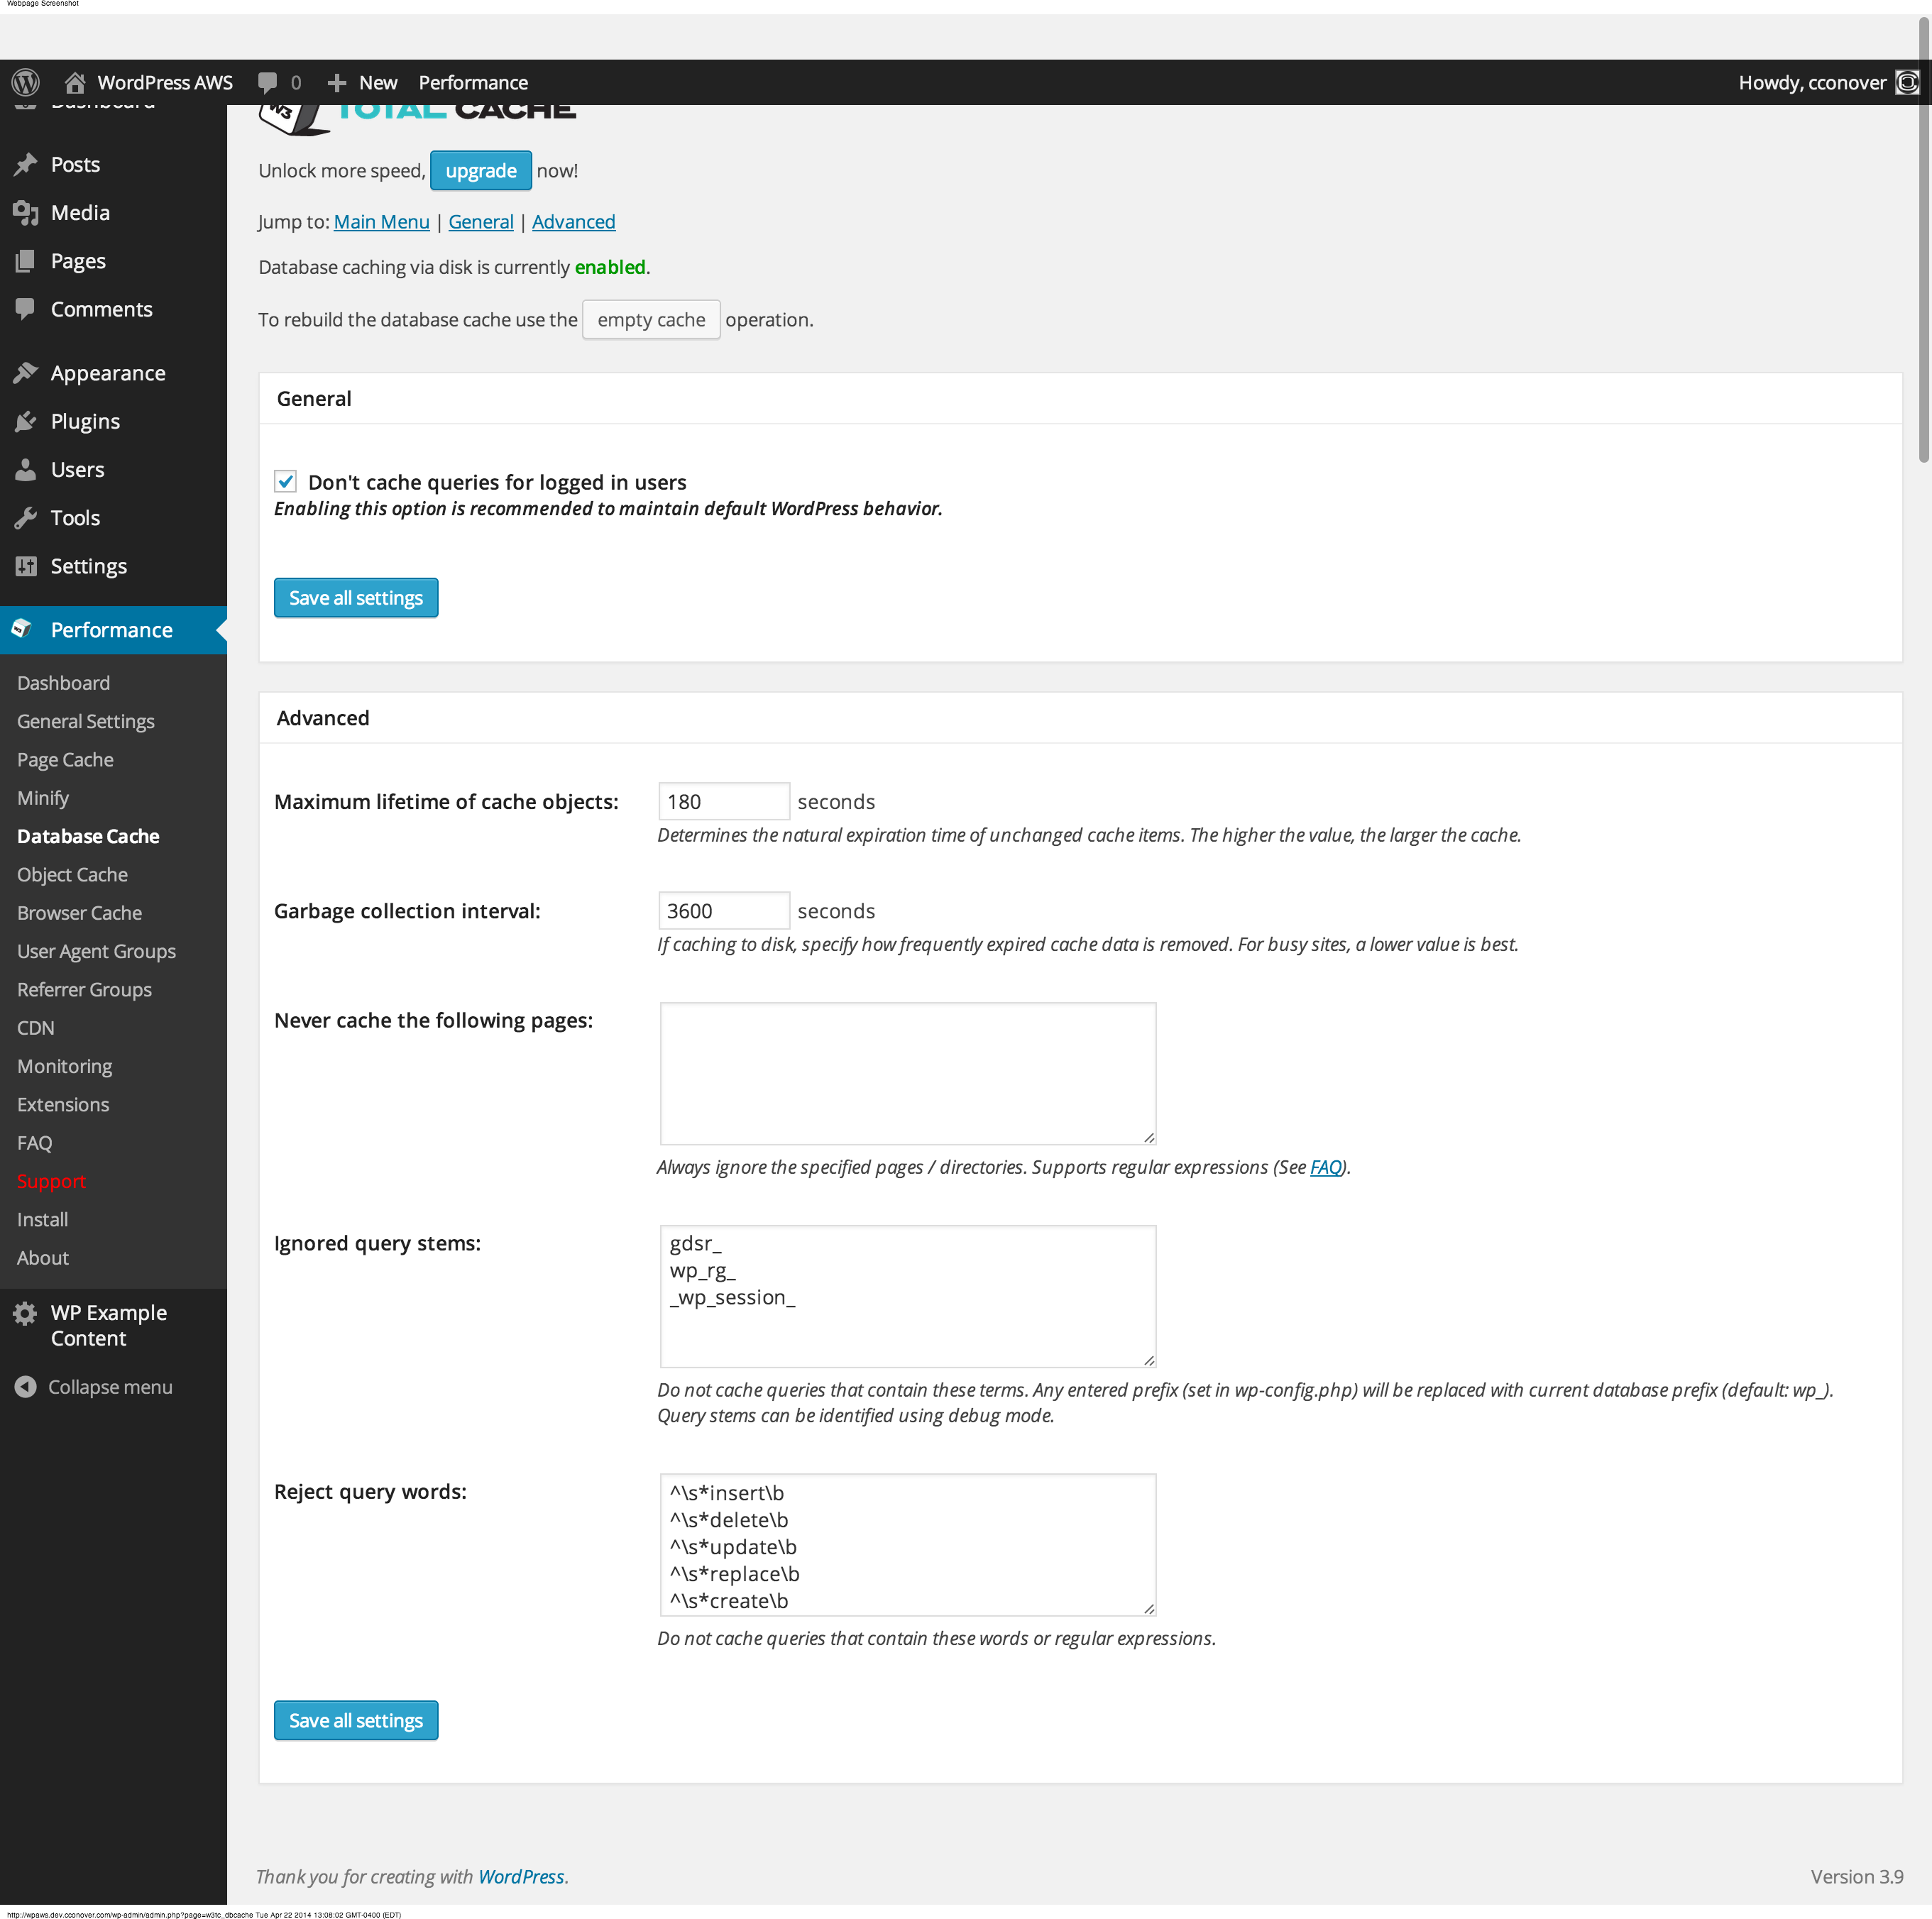
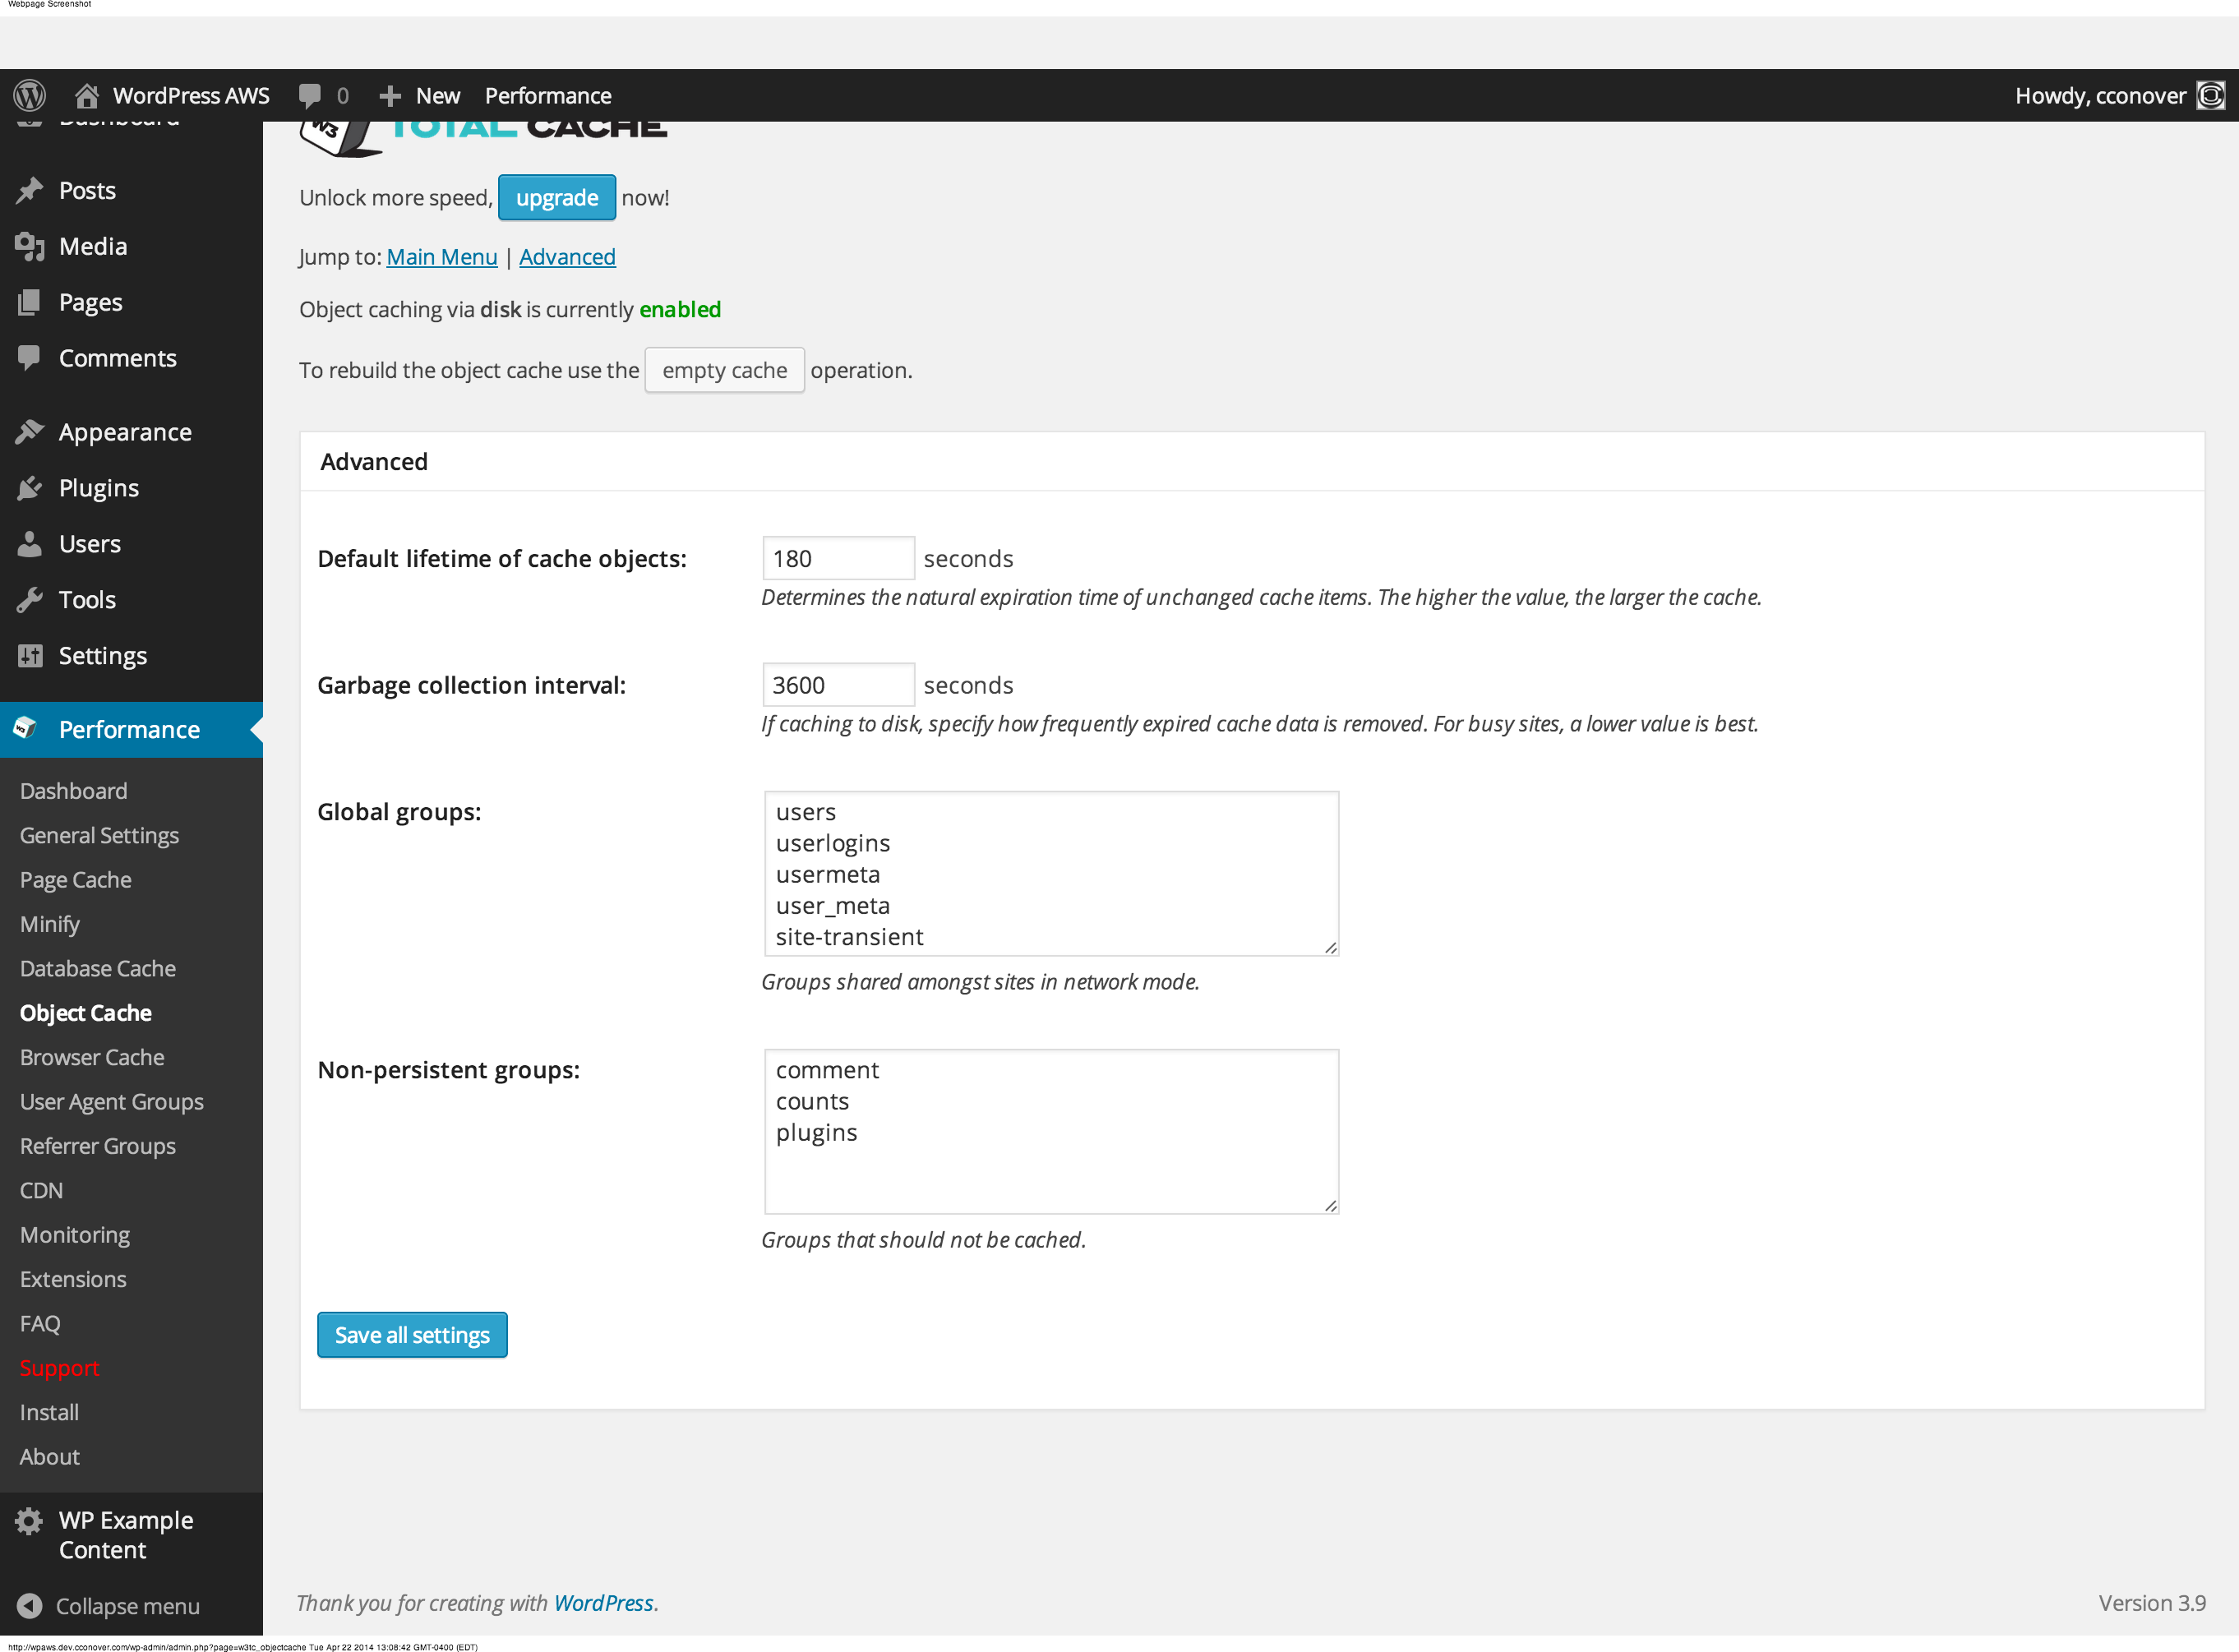
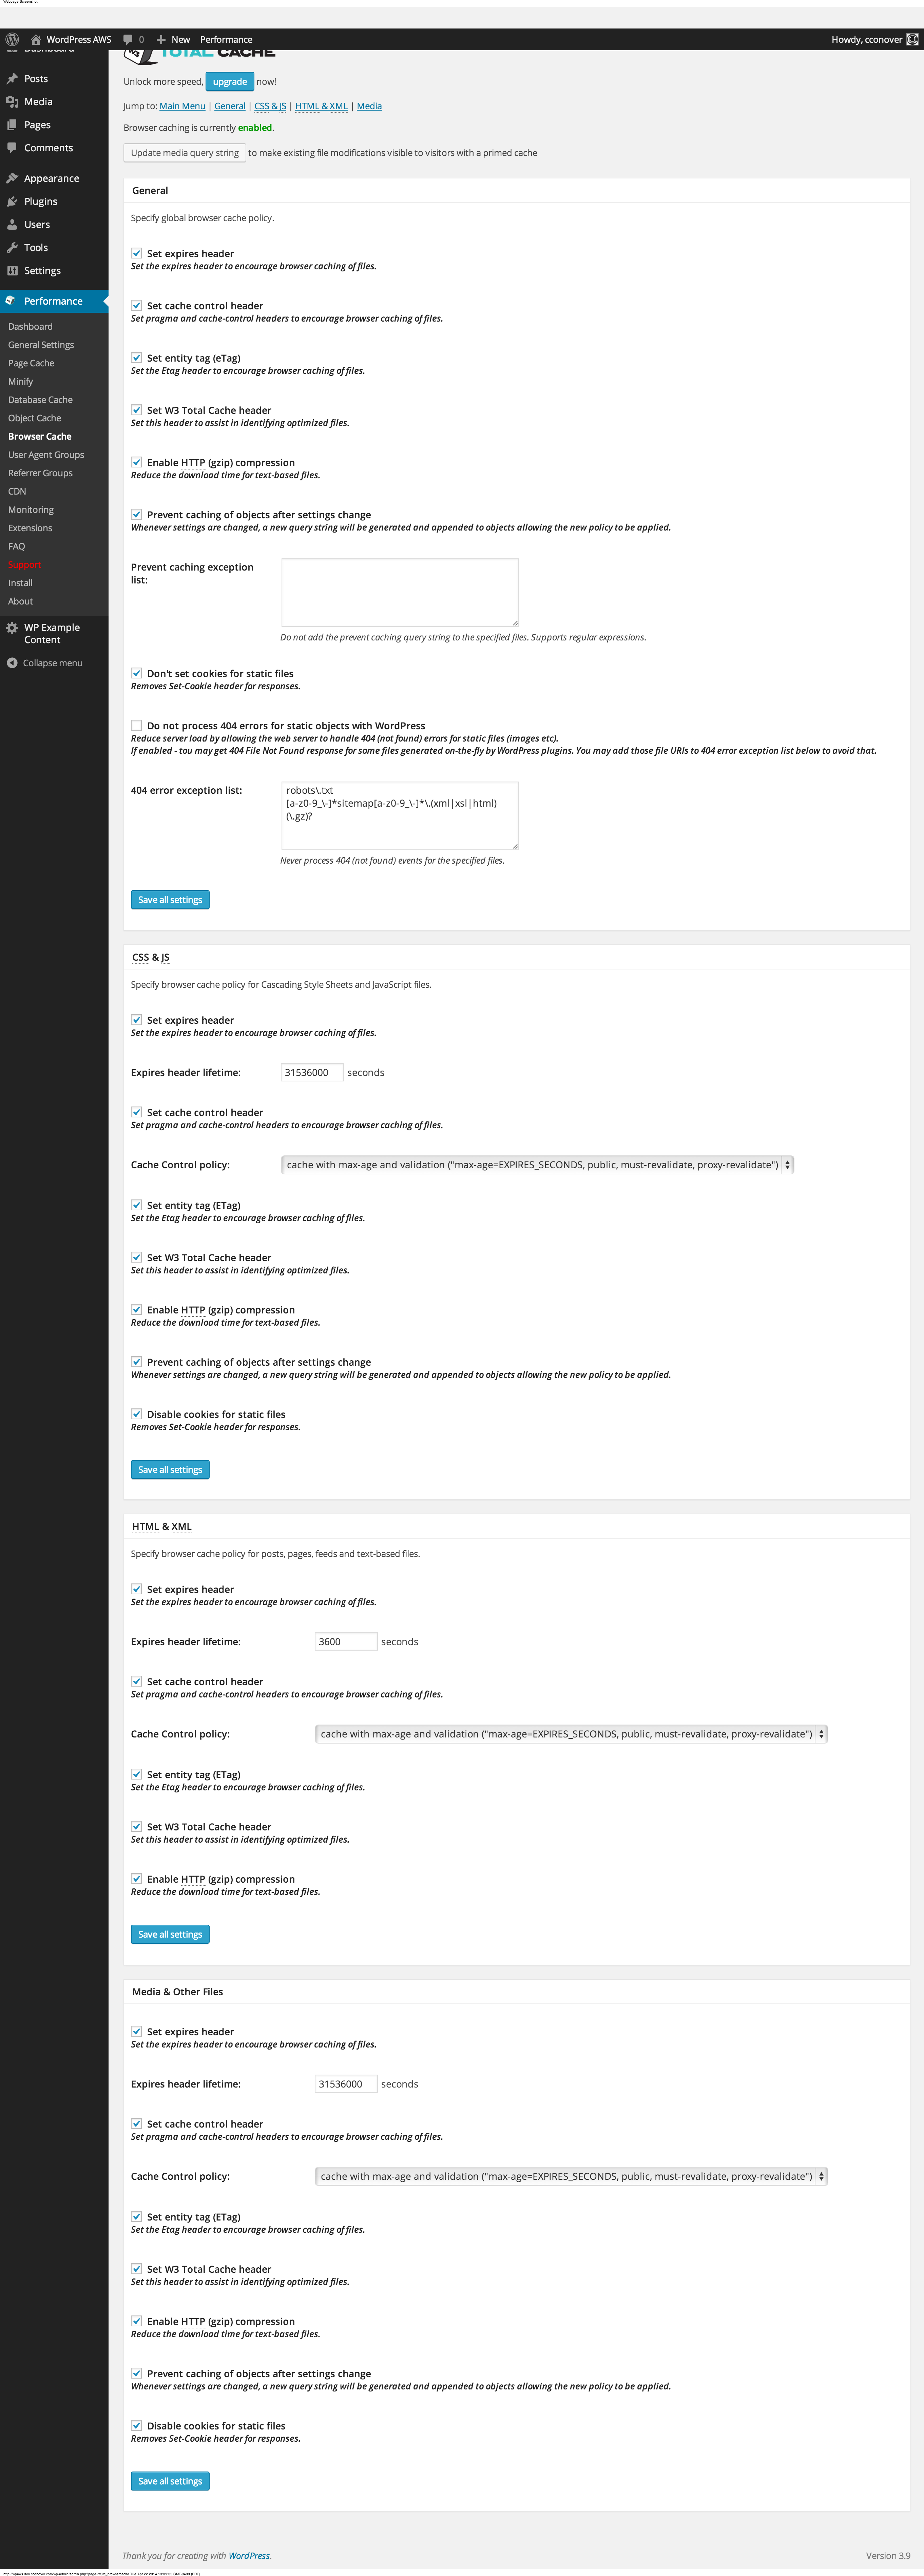
Part of the reason that a CDN is able to offer high bandwidth, low latency serving to clients is because it caches requested items on its edge location servers. CloudFront gives us the option to use the caching rules it receives from the origin server, which is what we want. To do that, we need to set up caching on our WordPress site using the W3 Total Cache plugin. We’ll be able to set up all the caching rules CloudFront needs, and have control over when cached items should be updated. Let’s go through the configuration you’ll want for the plugin. Match your settings for each page to what I have in the images below.
General Settings

Page Cache
Minify

Database Cache
Object Cache
Browser Cache
You can leave all the other W3TC configuration pages untouched.
Assuming you’re using Apache and support for .htaccess is enabled, that should be all you need to do for caching. If you use a different web server, Google how to set up W3 Total Cache with your server. If you have no idea what those sentences were talking about, you’re probably on the recommended setup and don’t need to worry about it.
We’re all done with configuring WordPress at this point. Any other settings changes you want to make are entirely up to you, and can be done after we’ve finished the rest of this tutorial. Let’s move on to CloudFront!
CloudFront
To use CloudFront you’ll need an Amazon Web Services account. If you’re an Amazon.com customer you can use your same login information on AWS. Once you’re logged in to your AWS account, click the CloudFront link.

You’ll be taken to the CloudFront management console. Click the “Create Distribution” button.
A distribution on CloudFront is an instance on the CDN for a particular site. You can configure a variety of options for how you want the distribution to handle content serving, which we’ll go over in detail now. It’s important to get this part just right.
First, we’ll choose Web for the delivery method and click Continue.

The next screen is where all the magic happens. To start, we need to configure the origin (where CloudFront will get everything). Remember that subdomain we set up on our WordPress host? Grab that, and paste it in both the “Origin Domain Name” and “Origin ID” fields. Leave the Origin Protocol Policy set to “HTTP Only” and leave the port numbers for HTTP and HTTPS as they are by default (should be 80 and 443, respectively).

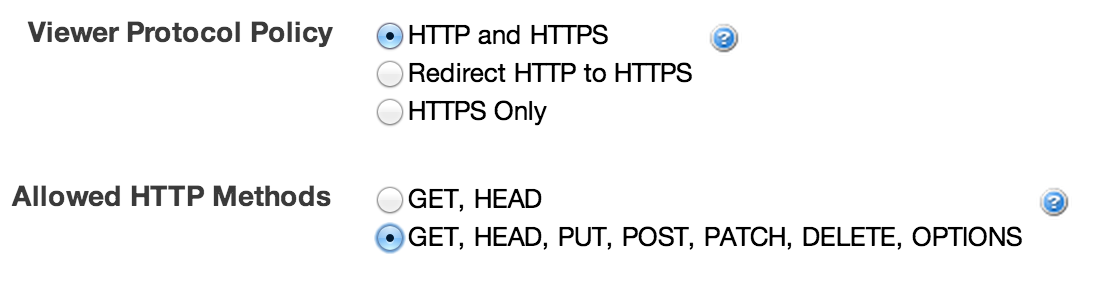
Next we’ll set up caching behavior. For Viewer Protocol Policy, leave it set to “HTTP and HTTPS” which should be the default. For Allowed HTTP Methods, choose “GET, HEAD, PUT, POST, PATCH, DELETE, OPTIONS” so we can not only view pages on our site, but also manage it.
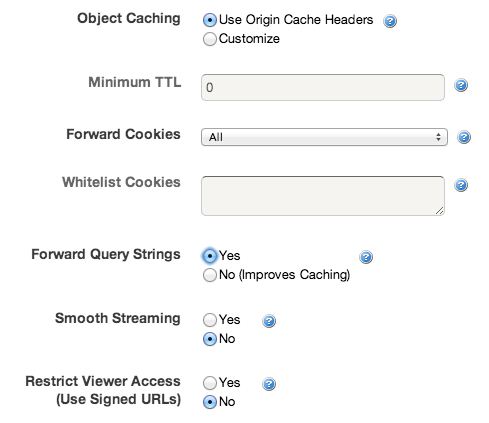
For Object Caching, set it to Use Origin Cache Headers. Set Forward Cookies to All, and Forward Query Strings to Yes.
Leave Smooth Streaming and Restrict Viewer Access both set to No, which should be the default.
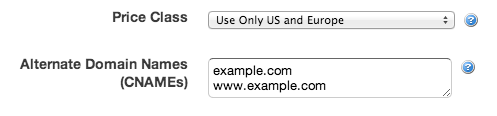
Remember earlier I mentioned that we can configure CloudFront for cost savings? We’ve reached the point where we do that. Amazon charges different amounts per gigabyte of data served by CloudFront, depending on which edge location the content is served from. Locations in the U.S. and Eurpoe are the cheapest, and the prices are higher elsewhere in the world. You can see the full breakdown of cost on the CloudFront pricing page. If you want to save yourself some money and/or aren’t terribly concerned with providing lightning fast load times outside of the U.S. and Europe, you can choose the price class that restricts your distribution to only use edge locations in those parts of the world. To be clear: your site will still be available worldwide, it’ll just be served from servers in certain parts of the globe. If you choose the U.S. and Europe price class, your site will still be accessible in Hong Kong and Australia, but you won’t be paying extra to put your site’s content geographically closer to those users.
For this tutorial, I’ve chosen the U.S. and Europe Price Class.
Alternate Domain Names is where you’ll specify what addresses you want this distribution to respond to. This is where you put your site’s actual, public facing address that you want your site’s visitors to use. You can specify multiple addresses, such as “example.com” and “www.example.com” by putting each one on a separate line.
We’re not discussing how to set up a site that uses SSL in this tutorial, so you can ignore the entire section that talks about SSL. Just leave those settings at their defaults.
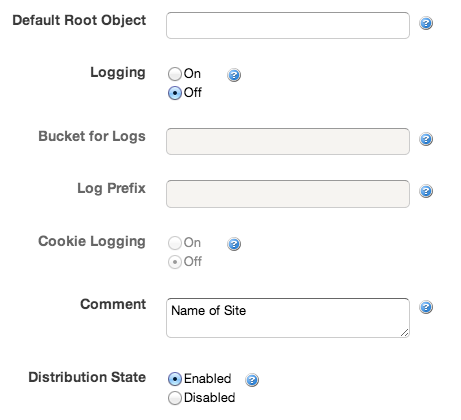
Leave Default Root Object blank. We don’t need this field, since WordPress doesn’t show actual file names for the pages it manages. If somebody types in your site’s address, CloudFront will serve whatever WordPress hands back to it for your site’s main page. Hooray WordPress!
If you’d like to enable logging you’re welcome to, but for this tutorial I’m leaving it off so I won’t be discussing how to set it up.
The Comment field is for you to provide a way to easily idenfity what this distribution is being used for. I usually put the name of my site in this spot, so I know that the distribution is acting as a the public-facing part of my site’s architecture.
Finally, make sure that Distribution State is set to Enabled.
Click Create Distribution. Your CloudFront instance is now spinning up! On the management console for CloudFront you’ll see your distribution’s status as “In Progress” while it deploys your configuration to all the relevant edge locations around the world. This process can take about 15-20 minutes, so while it’s doing its thing let’s move on to the next step.
First, click on your CloudFront distribution, and then click on the button at the top that says Distribution Settings. Copy the Domain Name for your distribution.
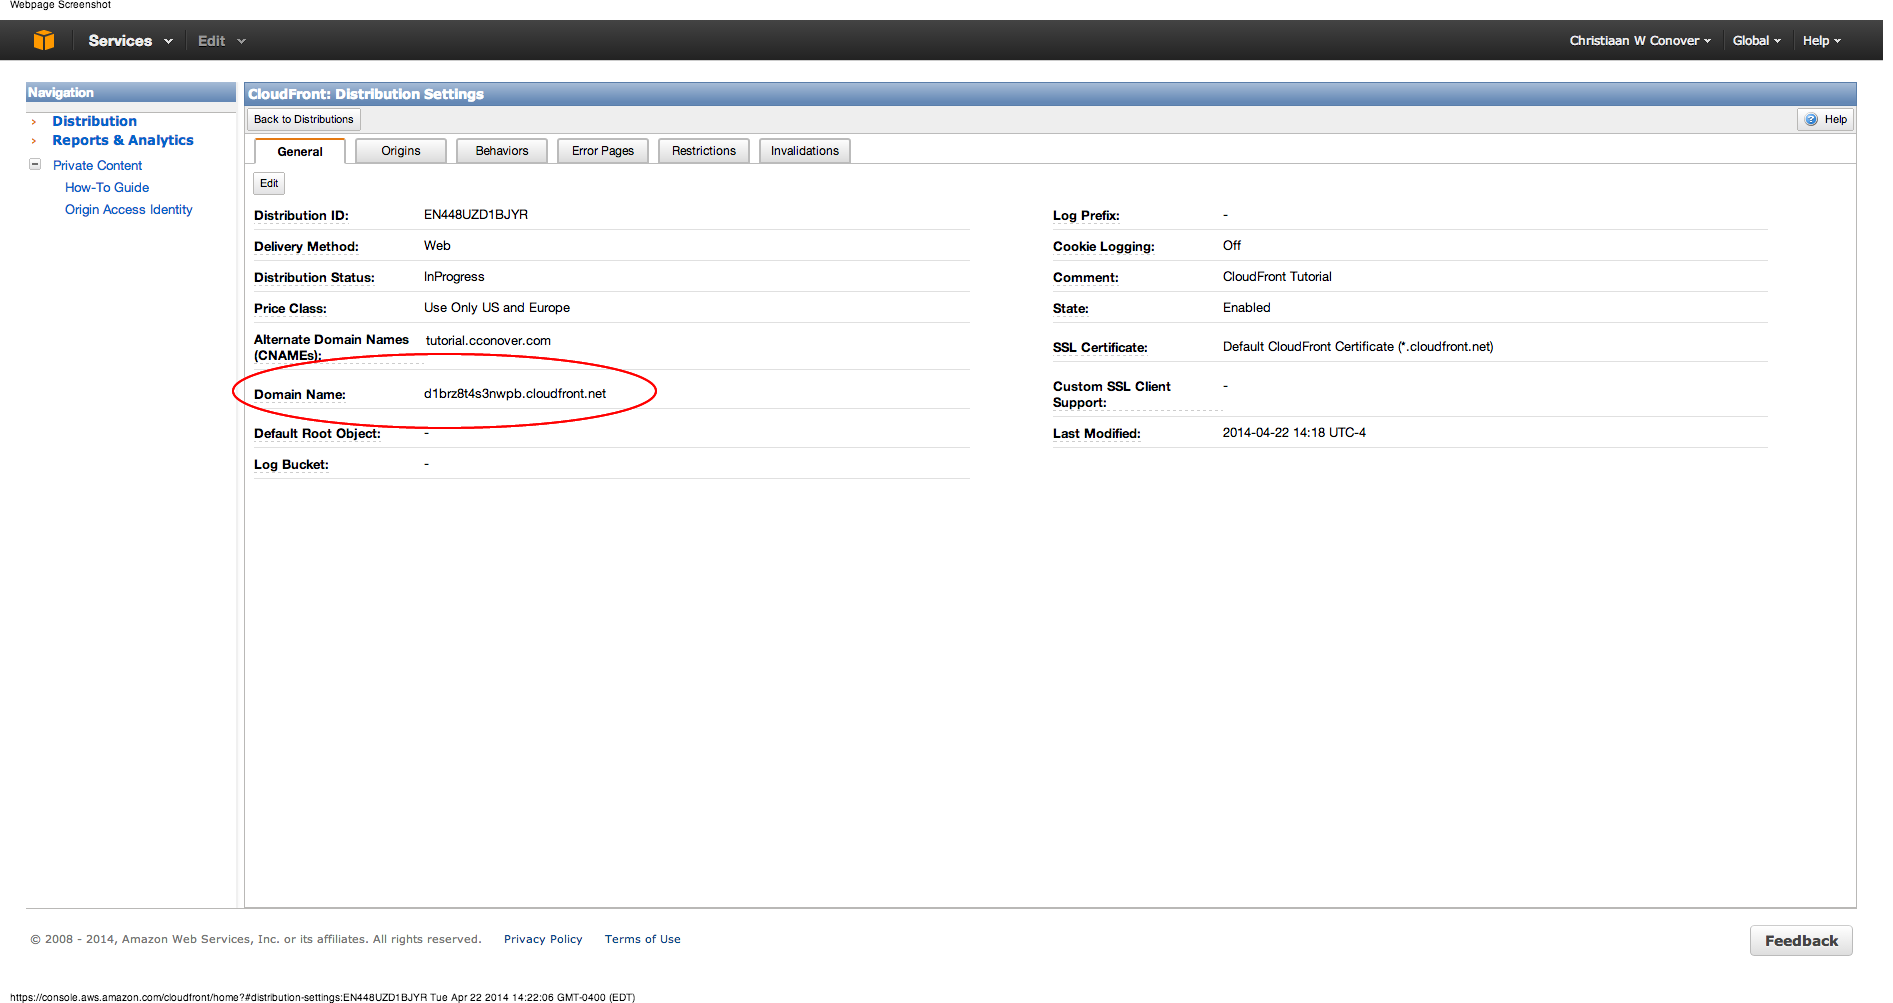
Click the button labeled Back to Distributions so you can keep an eye on the progress of your distribution’s deployment.
CloudFlare
Now let’s head over to CloudFlare. If you’re already a CloudFlare user, awesome! If not, you’ll need to create an account. Once you’re logged in, add your domain to your CloudFlare account if you haven’t already. Follow the steps that they guide you through.
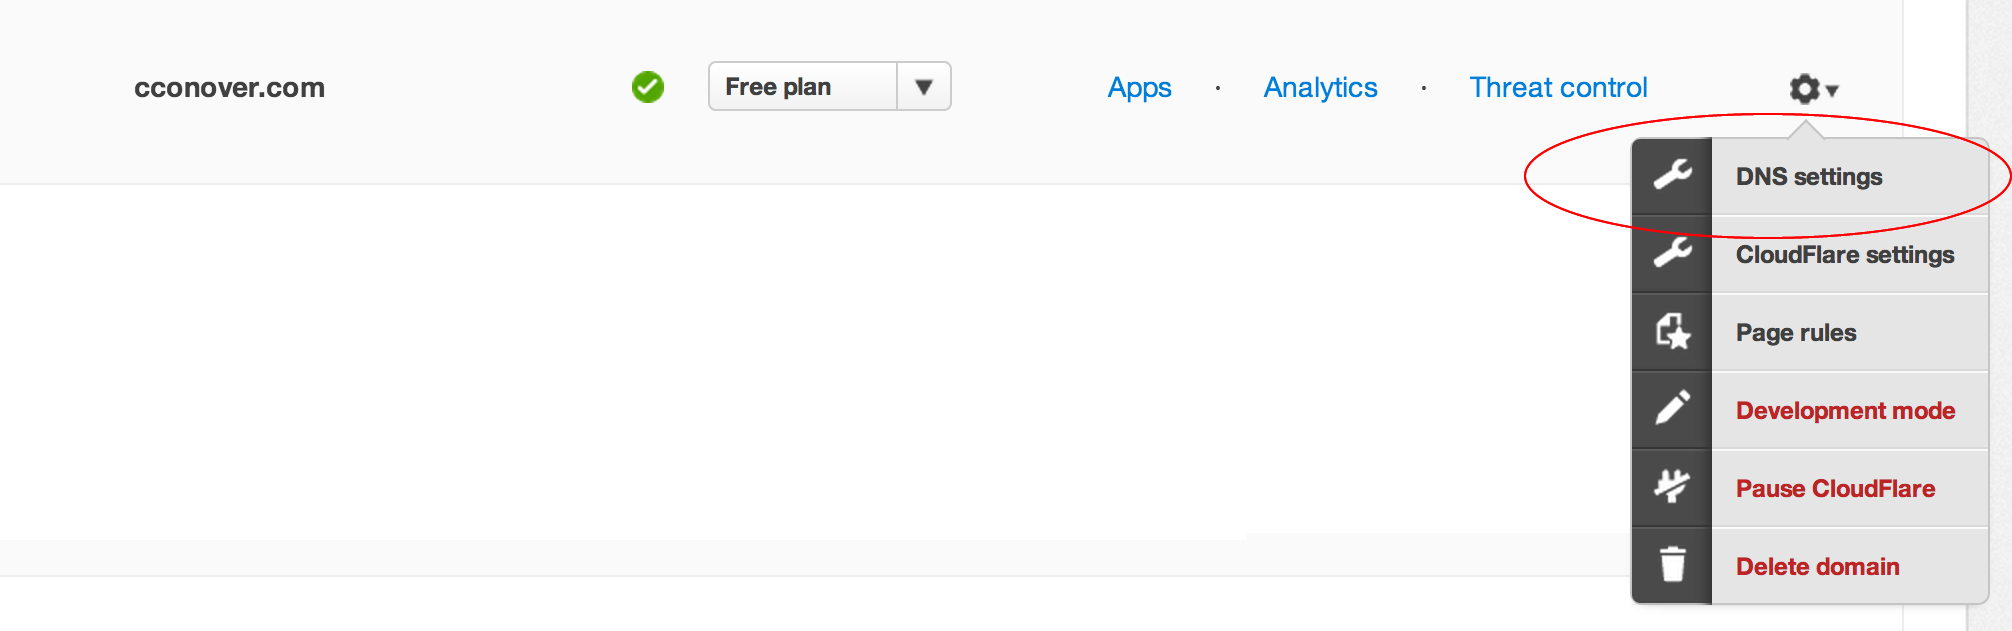
Once your domain is added, and CloudFlare says it’s configured properly, click the gear icon at the right end of your domain’s entry and click DNS Settings.
If your DNS records have an A record for the address you’ll be using with your site, click the gear icon to the right of it and click Delete (even if you’ll be using the root domain). We aren’t going to be using an A record to point to your CloudFront distribution, since your distribution does not have a fixed IP address. Instead, we’ll be using a CNAME record, which is sort of like an alias for another location.
If you’re familiar with how DNS works you may be thinking, “wait a minute, we can’t use a CNAME for the root domain!” and strictly speaking, you’re right. However, CloudFlare makes this possible because they act as an intermediary, so your public DNS records will have an A record that points to a CloudFlare server, and CloudFlare will then handle the root domain CNAME routing internally. Pretty slick, huh?
Now that we’ve removed the A record for our site’s address, it’s time to set up the CNAME record. At the bottom of the page is a form to add a new record. Click the dropdown box and choose CNAME from the list. In the next field, put the address for your site, minus the root domain. If you’ll be using the root domain, just put the @ symbol. In the next field, paste the domain name you copied from your CloudFront distribution settings. Leave the final dropdown set to Automatic.

When you’re done, click Add. Your record will now show up in your DNS records list. At the right end of your record, you’ll see a cloud icon with an arrow. Make sure it’s lit up orange, and not a gray silhouette. This makes sure that everything gets routed through CloudFlare’s servers, instead of directly to your CloudFront distribution. This is critical to the aforementioned CNAME issue. If it’s not orange, click on it to toggle it on.

If you’re using the root domain as your site’s address, you’ll want to make sure that any requests to your site that use ‘www’ at the front will still get to the right place. If you’re using ‘www.yourdomain.com’ as your site’s address, you’ll likewise want to make sure that all requests to the root domain end up there. To do this, we’ll need a second CNAME record.
If your site is at your root domain, add another CNAME like so:

If your site is at ‘www’ add a CNAME like so:

This ensures that traffic ends up where it’s supposed to be. If your site is at any other subdomain, you don’t need to worry about this. Like the first CNAME record we entered, you should make sure that the cloud is orange once the record is added.
The final step is to add a record for our origin’s address. Go back to the form to add a new DNS record, but this time choose A record from the dropdown. Put the origin subdomain we created when installing WordPress in the first text field. Get the IP address of your origin server and paste that in the second text field. Leave the final dropdown set to Automatic, and then add the record.

For the origin record, make sure the cloud is NOT orange, but gray instead. If it’s orange, click on it to toggle it off.

You’re all set with your DNS records, so you can click the “I’m done entering my DNS records” button at the bottom of the page.
Let’s hop back over to CloudFront and check the status of your distribution. If it says “Deployed” then we’re almost done! If it’s still in progress, then we still have to wait some more for it to be ready. Once it says Deployed we can move on to the next step, but not before that.
When your distribution is deployed, go back to your WordPress site using the origin address we created when we first set it up. In the admin dashboard, go to Settings -> General. Update the WordPress Address and the Site Address URLs to your site’s public-facing domain, including the http:// at the beginning, and no trailing slash. Click “Save Settings” at the bottom of the page.

WordPress will now redirect you to the settings page at your site’s public-facing address. Since you haven’t logged in through this address before, it will prompt you to log in. Once you’re logged in and everything is working, you’re all set!
Congratulations! Your site is ready for whatever traffic you can throw at it. Maybe you take awesome pictures that go viral, or write great WordPress tutorials that make tons of people’s lives easier (see what I did there?). Whatever happens, your site is ready - and you set it all up yourself!
It’s also being protected from certain types of attacks by CloudFlare. If you want to tweak how CloudFlare handles your site, you can get all the information about it from CloudFlare’s help documentation.
One More Thing…
If you want, you can stop here and live out the rest of your days with a rock solid hosting architecture. If it were me though, I’d go one step further to potentially save myself a lot more money. Enter Jetpack for WordPress.
Jetpack is a plugin maintained by Automattic, the guys behind WordPress.com. It’s kind of a super-plugin that contains a lot of modules to make your site run better and easier to manage. The Jetpack site explains what each one does, but the one we’re interested in is Photon.
Photon is a CDN offered for free to self-hosted WordPress site operators by Automattic for images. Pictures make up a significant percentage of a page’s total size, and the more data CloudFront has to serve the more expensive it is. Instead, you can hand off this job to Photon and let Automattic foot the bill for serving your pictures.
Setting it up is incredibly easy. Install the Jetpack plugin, connect it to your WordPress.com account (create an account if you don’t already have one), and then activate the Photon module. That’s it! You don’t have to do anything differently when you write posts or pages, Photon transparently works in the background to handle serving all your images to visitors.
Now we’re really done. Your site can scale with the best of ‘em on a shoestring budget. Start posting awesome stuff!
Ironically, my own site can’t use this setup at the time of this post’s writing because I use full-time SSL and CloudFront doesn’t support my certificate since it uses a private key that’s larger than 2048 bits. Hopefully they add support for larger private keys in the future, and then I can take advantage of this for my personal site as well.
comments powered by Disqus